It's been silent for a bit now.
I've got my San Diego Thrift Store Reviews halfway ready, but I was out of town this weekend and I'm currently suffering from a nasty cold. (Obviously not nastly enough for me not to write this) But for nothing else than to get my butt into gear.
I also realize today that the past few months, yes months, have been very unproductive; especially in the sewing department. I've got to work on that! Shame on me! More to come soon...

Wednesday, March 16, 2011


Wednesday, March 9, 2011
San Diego Thrift Store Review: #2 AmVets, Spring Valley/Lemon Grove
AmVets, Spring Valley

Are you ready for the second installment of the San Diego Thrift Store Review? Yes? Good. This one's not quite as positive.
Located not far from, and not to be confused with, the Veteran's Thrift Store in Spring Valley, the AmVets Thrift Store is interesting, if not crowded. Not as easily accessible as Veterans- which this just off the 94-this thrift store is in a funky spot. If you're headed to Veteran's, I would suggest stopping by AmVets as well because it's not too far.
The pros of this place are as follows:
Large size, with lots and lots of interesting stuff. I once found these old coasters that were AMAZING but I didn't buy them and have been kicking myself ever since. I also found these gems the last time I went:

(at my house...the store doesn't have carpet...)
A crazy bronze colored anchor clock and the book Fantastic Fit for Every Body which has gotten great reviews from everyone I've met. And guess what's even better? It was in a bag!

I love me some bags of crazy goodness! Seriously. Granted they can be full of weird stuff, but there are gems to be had! They have these all over the store in various strategic (not) spots.

It doesn't look packed, but it was! I'm eager to find the least-busy time to go on my next visit.
I'll sum up my cons like this:
Clothing section is abysmal. Well. It's large but there's nothing good except for faded forver21 shirts that are grossly overpriced.
Also, the customer service leave something(a lot) to be desired. But I won't go into that.
Cash Only.
Crowded.
Overall dirtier feel.
No natural light.(Nit-picky, but true)
Beware: They close at 6pm!
But like I said, if you're in the neighborhood going to Veterans Thrift Store, stop by this place and peruse the back back wall for the cool home accessories.
Directions:
I always come from the SDSU area and I go down -through Lemon Grove-some obscure back roads(Skyline Dr) until it turns into Cardiff Rd and then it's on the left. However, if you can get to CA-125, take the Jamacha Rd exit, head west, you'll pass the Veteran's Thrift Store on your left and then turn right at Jamacha. It's on the corner.
Previous Thrift Store Review Posts
Monday, March 7, 2011
How I "designed" my wedding dress
I was just on Grosgrain and saw the post about wedding dress designing. Or semi-designing. Then I realized that this post has been a draft for sooo long! I can't believe I didn't post this sooner. Shame on me.
I first started writing this post because of Rebecca of Sleepy Dreamer Design.  She used adobe Illustrator to sketch out design ideas that she liked. Illustrator is so useful like that!
 She used adobe Illustrator to sketch out design ideas that she liked. Illustrator is so useful like that!
Here's a picture of Rebecca in her beautiful dress!
 Check out her blog for more
 Check out her blog for more
Now although I wasn't as ambitious as Rebecca, I customized my dress. I initially got this dress from a former T.A. at college. The dress was beautiful, fit wonderfully, but elements of it just didn't look all that great on me. What I ended up doing, with the help of my mother of course, was to dissect the dress, keep what I liked and change what I didn't. It actually ended up being a very reasonable endeavor. It looked something like this to begin with....

 (don't look at my face!)
I loved the top, but from the waist down it. Was. Funky . I also didn't like the point at the bottom of the bust. I'm not actually sure what that's called, but it wasn't doing anything for my 5'2 frame. So that all had to be changed. I guess I could show you a better picture, but I'm too vain to blow up that horrible picture of myself.
Before you judge me, know that this is where I lived in college. I know it's gross. You don't have to tell me.
Before you judge me, know that this is where I lived in college. I know it's gross. You don't have to tell me.
But.
I ended up with this...
 May 16, 2009, San Diego, CA
I ended up with this...
 May 16, 2009, San Diego, CA
Realize that when I got home, my mom and I stared, yes stared, at the dress. For a long time. We were scared. Very scared. We didn't want to ruin it- for obvious reasons. And then we realized that I got the dress for free and if it came out bad, at least I wasn't out any money. And I only liked the top...
I didn't take any pictures (I know, I know..) of the process of us changing the dress. But here's what we did:
We left the top as is. I liked that part. We cut the bodice off at the natural waist, eliminating the pointy thing- what's that called? took off the top few layers of tulle. Pretty, but i just didn't think it was working with the top. We used the satin from underneath the tulle to make a simple a-line skirt. I was going to make the dress a tea length, but then as we were fitting it I realized how pretty the long skirt was and couldn't let it go.
If you want to see more pictures from our low-key DIY wedding and more of the dress, go here.
Thursday, March 3, 2011
San DiegoThrift Store Review: #1 Veteran's Thrift Store, Spring Valley

Not too terribly located off the 125 highway, Veteran's is a fun little shop that I would recommend. I would say it's medium sized, prices are usually pretty good, and the people are nice. Especially if you've just come from AmVets, this place will seem like heaven! (which is always the case. . . look for a review of AmVets to come)


They have this cool display case with interesting sewing things, like scissors, thimbles, old needle books, buttons and more. Everything locked in there seemed a bit pricey from what I could tell, but I still liked it.
They have a bunch of signs that say "Ask employees for help with knitting needles" or something close to that. I'm glad I did, because they had quite a few - pairs even!

They close a little early for my tastes, at 6:30, but it could be worse.
Overall, this is definitely a place I would recommend. They have enough quirky things to keep it interesting, without the fuss of AmVets. It's a thrift store I can get behind. The people that work there are helpful and I found the prices to be good. They have a large parking lot, so that's not an issue-- but beware the steep grade going into the parking lot. I've witnessed many a car bottom out. I wouldn't go here for clothes though. Dishes, knick-knacks, linens, etc = yes. Clothes = not a great selection.
Directions:
If you look on a map, this place is confusingly located near 'Skyline', 'Jamacha Lomita', and 'Spring Valley'. From just about anywhere in San Diego, you're gonna want to get on the 125 highway. From Downtown, National City, or North County- head east on either I-8 or the 54 highway. Don't be tempted to go down Imperial Ave. You make this that's a good idea, but it's just not. Take a look at a map if you don't believe me.
From the 54 highway: Head East (and North) the 54 intersects with the 94 and continue North until the Jamacha Rd Exit. Turn left off the exit. Turn left at Cardiff Rd and the store is on your left.
From the 94 highway: head east until the 125. Head south on the 125. Take the Jamacha Rd Exit and turn right, then left at Cardiff. The Store is on your left.
Wednesday, March 2, 2011
San Diego Thrift Store Review: The Beginning
If you don't already know, I moved to San Diego about 6 months ago and have since then been on the hunt for thrift stores. It's a way for me to get some gems and decorate my all-too barred house, while also learning this city better (the good, the bad, and the well..you know...)
I have been compiling a sort of cheat sheet based on my experiences at said thrift stores. This list probably won't be completely comprehensive, and it sure as sugar is going to biased towards my opinions and experiences there, but I hope that others will find it helpful.
"Should I really trek all the way to Spring Valley just for Am Vets' and Veterans'?".... all will be revealed
I am resolved to skip over some of the bigger names (ahem, Goodwill and Salvation Army, ahem). I like a Mom and Pop thrift shop (RHYMING!) as much as the next person, and I often find these bigger places to have higher prices and less quaint, quirky stuff- which just so happens to be the kind of stuff I like the best. Is it just me or are they the McDonald's of thrift shops?
My extremely subjective and completely biased views will be loosely based on the following criteria:
1. Overall finds, gems, and prices
2. Customer Service
3. Convenience of location, ease of parking and area of town
I'll leave you with these two teasers.


Look for the first review later this week!
Tuesday, March 1, 2011
Mini Book Review
Backstory: there's a library just a few blocks from my house. Half a mile at most. It's not a big library, but something about libraries is thrilling to me (if you know me, you know I currently work in a library as well). I sometimes go there to just peruse. I love craft, sewing and decorating books, but being a small library, they usually don't have a ton, especially ones I haven't checked out yet.
But alas, I came across this gem. Home Cheap Home: a room by room guide to great decorating by the editors of Budget Living Magazine. Sometimes I roll my eyes at books like this...like "yeah that $700 coffee table IS a steal" (can you sense the sarcasm?) but there were a lot of things in here that I liked.


The other thing in this book that really caught my eye was this cute suitcase turne side table/night stand. So do-able. They've just added legs. Plus, I really love the color.

The only thing I thought this book could use more of would be DIY projects, but overall I found it full of beautiful, interesting homes. So if you see it in the library, check it out. (And I'm not just saying that because I work in a library.)
But alas, I came across this gem. Home Cheap Home: a room by room guide to great decorating by the editors of Budget Living Magazine. Sometimes I roll my eyes at books like this...like "yeah that $700 coffee table IS a steal" (can you sense the sarcasm?) but there were a lot of things in here that I liked.

My favorite was The Collector living room.

I really, really love that dresser. I know it's probably "midcentury" (so sick of hearing that word! anyone else?) but I think the handles set the whole piece off. It's such a subtle change that I probably wouldn't think of it. I also wonder if you could pick up a dresser and add a base with legs to the bottom of it.


The only thing I thought this book could use more of would be DIY projects, but overall I found it full of beautiful, interesting homes. So if you see it in the library, check it out. (And I'm not just saying that because I work in a library.)
Monday, February 28, 2011
Pantone Colors
Have you checked out pantone's colors yet?

I always thought honeysuckles were yellow and white...
But I'm loving this color so I'm cool with it.
Read more about Honeysuckle, the color of 2011, Here
As for the other spring 2011 colors:

I'm really loving Beeswax and Blue Curacao
Head on over to Pantone and check it out.
Wednesday, February 16, 2011


Thursday, February 3, 2011
Another Jeans Makeover: Resizing the waist (and booty)
Remember back to this post about making jeans smaller in the waist? Well. I'm back with another one. Don't be disturbed by the fact that these jeans have almost the same color wash as the last ones....what can I say...I like dark jeans! (Believe me, they are different). My last tutorial was not quite as inclusive and detailed as I would have liked. I hope that these instructions are more clear.
Let me qualify that statement with this:
Which jeans can I resize to make a better fit for me?
Okay, here's how it's gonna go... just like most everything else (in sewing, AND in life)there's a simple rule: bigger to smaller. Most jeans are serged and then stitched down (like a flat fell seam) This leaves a small seam allowance. Plus, you won't have any excess to take from the waist band. Basically what I'm saying is don't try it. It just doesn't work out the same way.
My jeans are a 98% cotton/2% spandex blend. I bought them about a year ago and I've hardly worn then since. After I wash/dry then (and, coincidentally after I bought them) they fit great. BUTT then! And this is a big BUTT, they would stretch out and be all baggy and saggy around the waist and bum area. Not pretty.
The Basic Steps
1. Unpick and seam rip open some seams
2. Baste it smaller and try on (repeat where necessary)
3. Sew it back together with a center back seam.
I'm going to level with you: steps one and two are not that hard or time consuming. Step three is where it begins to get tricky. But without further ado, lets begin making some bootylicious jeans.
Don't be intimidated by the amount of steps. I know it seems like a lot, but I wanted to be thorough.
.
1. Try on pants (duh) to see how they fit and where your problems areas are (don't get me started on the "problem areas"....) and mark roughly or keep a mental note how much needs to come out to get rid of that saggy nastiness


2. Unpick your belt loops. Also remove the top stitching down the center back seam.
3. Start to unpick the waist band. You'll notice that I did not seam rip a lot of mine. I didn't want to lose the original stitching as much as possible. But, the less you unpick, the more difficult it will be later because you'll have to maneuver in some small sewing areas.


When you turn it inside out you should see something that looks like this, minus the scissors or red stitching. I forgot to take a picture of what it will look like, but you should be able to separate the waist band and facing from the yoke and seat of the pants. Don't cut it like it looks like in this picture. (Okay, you probably can. If you are, just cut through both layers of the waistband)


6. The waist band will still be big at this point. Cut it in half if you didn't already. I find it easier to get a better fit in the seat of the pants while the waistband is intact, and then cut it afterwards.

 (We're looking at the back from the inside. The layer my finger is holding up is the waistband facing, and then below that is the waistband. )
7. On outside, baste down where the original top stitching was to the back yoke. Don't go through the facing layer though.

8. Now baste together (by hand) the top parts together. Mine had top stitching originally but when we sew the center waistband back together,we'll need those to be attached to get something cleaner.

9. Open the waistband and facing out flat. Then put right sides together, matching the top seams (the ones you just basted) It should look something like this(below). The far left is the center back seam, the left part is the waist band and the right is the facing. The facing will flip down and cover the inside of the waistband and keep it looking neat.


 (above you can see that I've topstitched my center back seam next to the seam in a gray thread. I haven't top stitched the other topstitching or the waist band yet.)
Let me qualify that statement with this:
Which jeans can I resize to make a better fit for me?
Okay, here's how it's gonna go... just like most everything else (in sewing, AND in life)there's a simple rule: bigger to smaller. Most jeans are serged and then stitched down (like a flat fell seam) This leaves a small seam allowance. Plus, you won't have any excess to take from the waist band. Basically what I'm saying is don't try it. It just doesn't work out the same way.
My jeans are a 98% cotton/2% spandex blend. I bought them about a year ago and I've hardly worn then since. After I wash/dry then (and, coincidentally after I bought them) they fit great. BUTT then! And this is a big BUTT, they would stretch out and be all baggy and saggy around the waist and bum area. Not pretty.
The Basic Steps
1. Unpick and seam rip open some seams
2. Baste it smaller and try on (repeat where necessary)
3. Sew it back together with a center back seam.
I'm going to level with you: steps one and two are not that hard or time consuming. Step three is where it begins to get tricky. But without further ado, lets begin making some bootylicious jeans.
Don't be intimidated by the amount of steps. I know it seems like a lot, but I wanted to be thorough.
.
1. Try on pants (duh) to see how they fit and where your problems areas are (don't get me started on the "problem areas"....) and mark roughly or keep a mental note how much needs to come out to get rid of that saggy nastiness

(this is just to show you how loose my pants are, we'll be adjusting through the center back seam)
Also take a picture or mental image of the back. You want to remember how i went together to get it as close as possibly as the before
2. Unpick your belt loops. Also remove the top stitching down the center back seam.
3. Start to unpick the waist band. You'll notice that I did not seam rip a lot of mine. I didn't want to lose the original stitching as much as possible. But, the less you unpick, the more difficult it will be later because you'll have to maneuver in some small sewing areas.

(I've seam ripped the top stitching on the center back and started on the waist band)

(this is how it looks without the top stitching. The seam is serged and still intact)

4. You'll notice that the waist band is not attached but merely top stitched together with the back yoke. That's okay. Later we'll baste it. Now turn pants inside out to baste the new back seam.


(apologies for the blurriness)

I put them on again inside out to mark an idea of where it needed to come in, then basted (in red) the new seam.
5. Try on pants after you've sewn the back seam and adjust fit. be careful with the amount of stretch your jeans may or may not have and how much wearing ease they will need. I had to sew mine several different times to get rid of the problem areas. Ugh.


Grade the new seam into the old one where it meets the crotch. You don't want to unpick all of the crotch- that's going to be a whole mess of trouble. Just undo the top stitching as far as possible and curve your new seam into the existing one. Trim off the excess fabric to apx. 1/2" inch. I carefully serged over the edge at this point, although it's not necessary since you'll be top stitching it later.
6. The waist band will still be big at this point. Cut it in half if you didn't already. I find it easier to get a better fit in the seat of the pants while the waistband is intact, and then cut it afterwards.


(see the red on the left? that's the basting.)

9. Open the waistband and facing out flat. Then put right sides together, matching the top seams (the ones you just basted) It should look something like this(below). The far left is the center back seam, the left part is the waist band and the right is the facing. The facing will flip down and cover the inside of the waistband and keep it looking neat.

10. Stitch through these layers matching up with the new center back seam you created. Flip the facing down and it will look like the below picture. It will probably be really lumpy, too.

11. Open it back out and trim off the extra seam allowances. This is when you will stitch (or double stitch) the back seam if you didn't already. You'll need to topstitch the center back seam (non waistband) with a thread that matches the original. Choose the side that corresponds to how to seam originally lay (on mine from the inside the seam allowance went to the right. Open out on right side and topstitch close to the seam. Then topstitch 1/4" inch away from that through the seam allowance (you're basically doing a flat felled seam, except that you're not grading the two allowances).
12. Once you're topstiched and trimmed, it's time to A.) start pressing that waist band and B.) fold it over and sew it down.
Oh, what's that, you don't usually iron jeans? ...


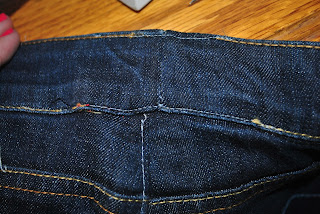
(now you can see that the waist band has been stitched both top and bottom in gray. I can stitch over the waistband and the center back seam again in a matching gold thread... when I get one.)
I noticed that my new seam in the waistband didn't quite match up to the center back seam. I could have fixed it but I was getting tired and have no excuse. BUT[T], I can put the belt loop over it and cover it up. So easy.
Try on, admire your new, non-saggy jeans butt and enjoy!!
Okay. I hope you made it to the end. I know that was a lot to take in, but my goal is that it is helpful and informative. If you follow this tutorial, I'd love to see pictures!
Tuesday, November 23, 2010
Tutorial: Making jeans smaller in the waist
After recently working on Chris' dress pants and making them smaller in the waist, it made me feel more confident in the pants department. Anyone else feel that pants are a little daunting? Possibly the contestants on Project Runway can attest to this by the ratio of pants to, say, skirts and dresses? Yes? I think so.

a handful too big
So. I've had these jeans for a long time. Think maybe since mid 2008. I have only worn them a handful of times. I think when I bought them I was having a really bloated day or something because they are just too big. So big in fact that I could just take them off without unbuttoning them. I mulled it over and decided to take them in at the back seam to make the waist smaller. I've seen a lot of tutorials about how to make jeans skinny, but not any on how to resize jeans to make the waist smaller.

Doing it this way means that your jeans will now have a center back seam in the waist band. Most jeans do not. Does this matter? No. My jeans even had a center back belt loop, so guess what, it gets covered up anyway. Here's a before of the back to get an idea of what it looked like.

Start by figuring out how much you want to take them in. This method only works for making the jeans smaller, not larger (sorry). I put mine on and just roughly chalked how much I wanted taken in.
Also, change your machine needle to a heavy weight. DO IT. You don't want to break a needle!
I started by taking of the belt loop. Sharpen your seam ripper. Those guys are REALLY stitched on there.

In the above photo you can see I've got the belt loop off and I've also started seam ripping the center back seam. If you look closely you can see that on the left is what used to be a row of [gray] stitching going down the center. I've also started slowly unpicking the waist band.
Note: Now most jeans often look similar in the back, like mine do. You'll probably notice that yours has a back yoke and a solid waist band, like mine. However, I cannot say whether they are constructed in the same manner. Take time to look at how they are put together- this will help you later if you try to put it together in a manner that it wasn't made to go.

Here I have started to unstitch the waist band. You can see my roughly drawn chalk lines on how much I want to take out. You'll want to unstitch slowly to make sure you know how it will fit back together. Unstitch both (if you have two) rows of topstitching (or just one if you've only got one) along the center back seam. It's serged so you don't have to worry too much.
Note: The top of the waist band on my jeans was topstitched, but it wasn't stitched together. Basically when I unstitched the topstitcing at the very top, there was no inside seam holding the band and the band facing together. I had to baste these together for the next steps (sorry, no picture of that)

Open out the band like shown.

(For doing a lot of graphic design work, I'm surprisingly terrible at microsoft paint)
I made a little Key:
Green Dot: Waist band facing
Red Dot and Orange 'stitching" where the band and the band facing meet. On mine I had to baste them together after I took out the top stitching
Yellow dot: Waist band
Pink 'stitching': where you will stitch (depending on how much you are taking in)
Use long machine stitches to baste the back seam. Go slow when you do the waist band. It will be difficult because you won't have unstitched that much (you want to keep as much original topstiching as possible to keep it looking the same)

In the above picture I started at the crotch. I started on the serged seam line and gradually met my chalk lines.

After basting, try one. Take in or out. You will have to cut straight out at the back (where my finger is in the pic above) to make it lay flat. Only to this on the waist band and facing. The rest of the excess you'll trim off later.


Notice how now there is a seam line in the waist that wasn't there before? Good. Also notice how my back yolk stitching doesn't line up? Bad. This is why it's basted. Carefully line them up, pin and sew slowly to match them up.
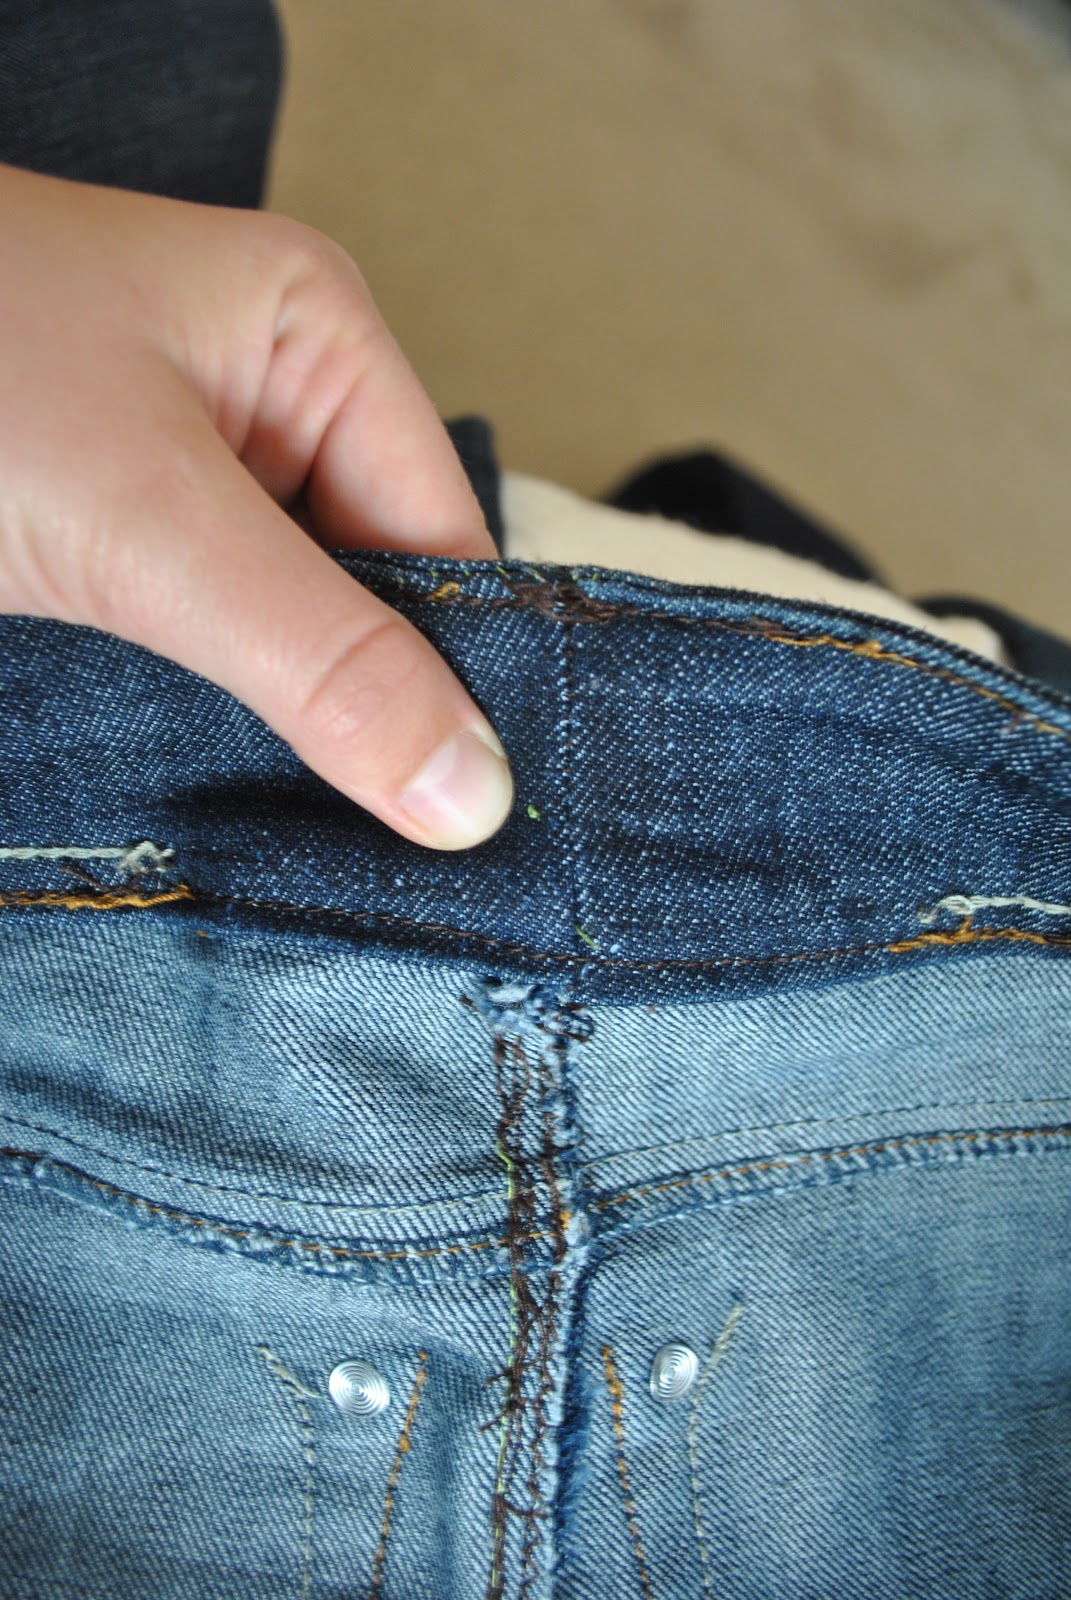
Here's the inside of mine. I trimmed off the excess to about 1/4"-1/2" fabric from the inside where it was serged. I zigzagged the edge and then topstitched it down from the outside. I didn't take many more photos of the process because mostly I just had to finesse it. Luckily, it turned out very forgiving. (Make sure to press, press, press!)

Topstich using a heavy thread (I only had a thick brown and a regular gray. I would suggest getting some that match the original top stitching that way it blends in even better). I had to top stitch the top of the waist band, the bottom of the waist band where it met the yolk, and the center back. Then stitch on your belt loop and voila! Enjoy your new pants.
Often, mens' pants have a center back seam to make it easier to customize the fit, or if you've seen this post from Gertie's Blog For Better Sewing, you can see how she used the center back seam to better fit her trousers. (Do you know that I LOVE her blog?)
With jeans, it's about the stitching: top stitching is what makes jeans JEANS. Don't be intimidated if it seems like a lot of steps. Any intermediate sewer is definitely capable of doing this. Mostly it's just figuring how it goes back together.
Happy sewing!
Subscribe to:
Posts (Atom)