Thursday, February 3, 2011

Another Jeans Makeover: Resizing the waist (and booty)

Remember back to this post about making jeans smaller in the waist? Well. I'm back with another one. Don't be disturbed by the fact that these jeans have almost the same color wash as the last ones....what can I say...I like dark jeans! (Believe me, they are different). My last tutorial was not quite as inclusive and detailed as I would have liked. I hope that these instructions are more clear.
Let me qualify that statement with this:

Which jeans can I resize to make a better fit for me?
Okay, here's how it's gonna go... just like most everything else (in sewing, AND in life)there's a simple rule: bigger to smaller. Most jeans are serged and then stitched down (like a flat fell seam) This leaves a small seam allowance. Plus, you won't have any excess to take from the waist band. Basically what I'm saying is don't try it. It just doesn't work out the same way.

My jeans are a 98% cotton/2% spandex blend. I bought them about a year ago and I've hardly worn then since. After I wash/dry then (and, coincidentally after I bought them) they fit great. BUTT then! And this is a big BUTT, they would stretch out and be all baggy and saggy around the waist and bum area. Not pretty.

The Basic Steps

1. Unpick and seam rip open some seams
2. Baste it smaller and try on (repeat where necessary)
3. Sew it back together with a center back seam.


I'm going to level with you: steps one and two are not that hard or time consuming. Step three is where it begins to get tricky. But without further ado, lets begin making some bootylicious jeans.

Don't be intimidated by the amount of steps. I know it seems like a lot, but I wanted to be thorough.


. 

1. Try on pants (duh) to see how they fit and where your problems areas are (don't get me started on the "problem areas"....) and mark roughly or keep a mental note how much needs to come out to get rid of that saggy nastiness
(this is just to show you how loose my pants are, we'll be adjusting through the center back seam)
Also take a picture or mental image of the back. You want to remember how i went together to get it as close as possibly as the before


2. Unpick your belt loops. Also remove the top stitching down the center back seam.

3. Start to unpick the waist band. You'll notice that I did not seam rip a lot of mine. I didn't want to lose the original stitching as much as possible. But, the less you unpick, the more difficult it will be later because you'll have to maneuver in some small sewing areas.


(I've seam ripped the top stitching on the center back and started on the waist band)

(this is how it looks without the top stitching. The seam is serged and still intact)


4. You'll notice that the waist band is not attached but merely top stitched together with the back yoke. That's okay. Later we'll baste it. Now turn pants inside out to baste the new back seam.
 

 When you turn it inside out you should see something that looks like this, minus the scissors or red stitching. I forgot to take a picture of what it will look like, but  you should be able to separate the waist band and facing from the yoke and seat of the pants. Don't cut it like it looks like in this picture. (Okay, you probably can. If you are, just cut through both layers of the waistband)

(apologies for the blurriness)


I put them on again inside out to mark an idea of where it needed to come in, then basted (in red) the new seam.

5. Try on pants after you've sewn the back seam and adjust fit. be careful with the amount of stretch your jeans may or may not have and how much wearing ease they will need. I had to sew mine several different times to get rid of the problem areas. Ugh.

Grade the new seam into the old one where it meets the crotch. You don't want to unpick all of the crotch- that's going to be a whole mess of trouble. Just undo the top stitching as far as possible and curve your new seam into the existing one. Trim off the excess fabric to apx. 1/2" inch. I carefully serged over the edge at this point, although it's not necessary since you'll be top stitching it later.

6. The waist band will still be big at this point. Cut it in half if you didn't already. I find it easier to get a better fit in the seat of the pants while the waistband is intact, and then cut it afterwards.

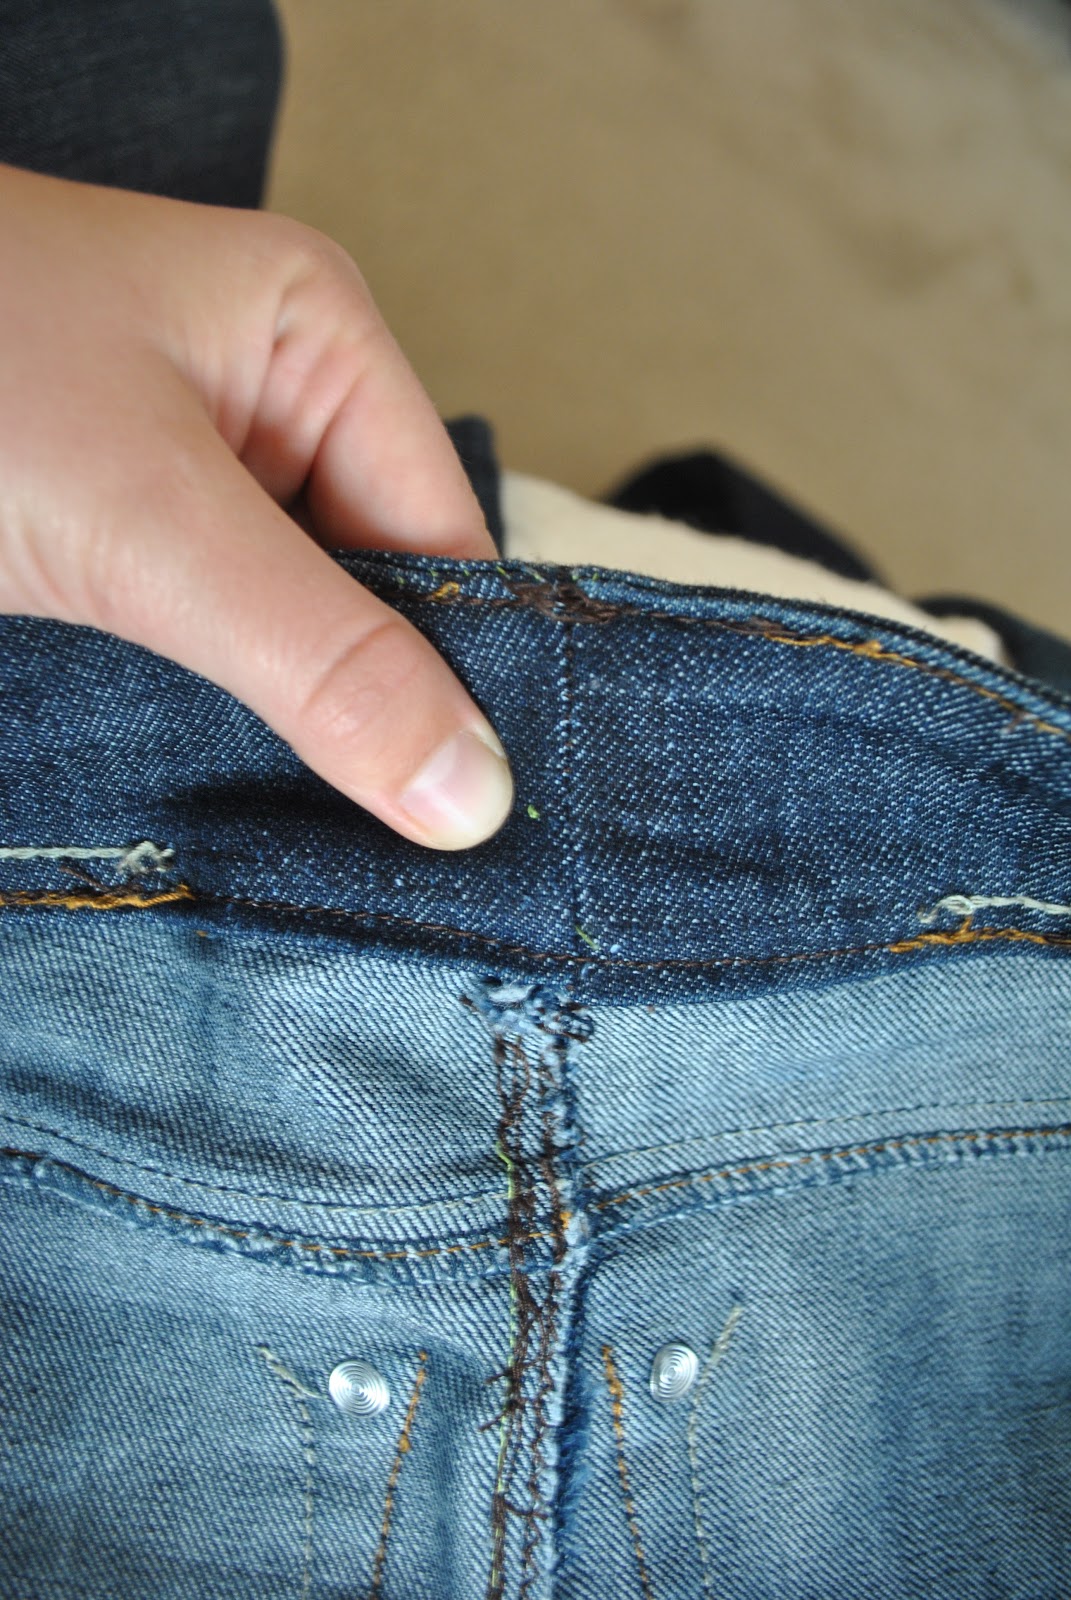
  (We're looking at the back from the inside. The layer my finger is holding up is the waistband facing, and then below that is the waistband. )


7. On outside, baste down where the original top stitching was to the back yoke. Don't go through the facing layer though.
 
(see the red on the left? that's the basting.)


 8. Now baste together (by hand) the top parts together. Mine had top stitching originally but when we sew the center waistband back together,we'll need those to be attached to get something cleaner.


 9. Open the waistband and facing out flat. Then put right sides together, matching the top seams (the ones you just basted) It should look something like this(below). The far left is the center back seam, the left part is the waist band and the right is the facing. The facing will flip down and cover the inside of the waistband and keep it looking neat.


10. Stitch through these layers matching up with the new center back seam you created. Flip the facing down and it will look like the below picture. It will probably be really lumpy, too.

11. Open it back out and trim off the extra seam allowances. This is when you will stitch (or double stitch) the back seam if you didn't already. You'll need to topstitch the center back seam (non waistband) with a thread that matches the original. Choose the side that corresponds to how to seam originally lay (on mine from the inside the seam allowance went to the right. Open out on right side and topstitch close to the seam. Then topstitch 1/4" inch away from that through the seam allowance (you're basically doing a flat felled seam, except that you're not grading the two allowances).

12. Once you're topstiched and trimmed, it's time to A.) start pressing that waist band and B.) fold it over and sew it down.
Oh, what's that, you don't usually iron jeans? ...


 (above you can see that I've topstitched my center back seam next to the seam in a gray thread. I haven't top stitched the other topstitching or  the waist band yet.)
 (now you can see that the waist band has been stitched both top and bottom in gray. I can stitch over the waistband and the center back seam again in a matching gold thread... when I get one.)

I noticed that my new seam in the waistband didn't quite match up to the center back seam. I could have fixed it but I was getting tired and have no excuse. BUT[T],  I can put the belt loop over it and cover it up. So easy.

 Try on, admire your new, non-saggy jeans butt and enjoy!!
Okay. I hope you made it to the end. I know that was a lot to take in, but my goal is that it is helpful and informative. If you follow this tutorial, I'd love to see pictures!

Tuesday, November 23, 2010

Tutorial: Making jeans smaller in the waist

After recently working on Chris' dress pants and making them smaller in the waist, it made me feel more confident in the pants department. Anyone else feel that pants are a little daunting? Possibly the contestants on Project Runway can attest to this by the ratio of pants to, say, skirts and dresses? Yes? I think so.


a handful too big

So. I've had these jeans for a long time. Think maybe since mid 2008. I have only worn them a handful of times. I think when I bought them I was having a really bloated day or something because they are just too big. So big in fact that I could just take them off without unbuttoning them. I mulled it over and decided to take them in at the back seam to make the waist smaller. I've seen a lot of tutorials about how to make jeans skinny, but not any on how to resize jeans to make the waist smaller.


Doing it this way means that your jeans will now have a center back seam in the waist band. Most jeans do not. Does this matter? No. My jeans even had a center back belt loop, so guess what, it gets covered up anyway.  Here's a before of the back to get an idea of what it looked like.

Start by figuring out how much you want to take them in. This method only works for making the jeans smaller, not larger (sorry). I put mine on and just roughly chalked how much I wanted taken in.
Also, change your machine needle to a heavy weight. DO IT. You don't want to break a needle!

I started by taking of the belt loop. Sharpen your seam ripper. Those guys are REALLY stitched on there.


In the above photo you can see I've got the belt loop off and I've also started seam ripping the center back seam. If you look closely you can see that on the left is what used to be a row of [gray] stitching going down the center. I've also started slowly unpicking the waist band.

Note: Now most jeans often look similar in the back, like mine do. You'll probably notice that yours has a back yoke and a solid waist band, like mine. However, I cannot say whether they are constructed in the same manner. Take time to look at how they are put together- this will help you later if you try to put it together in a manner that it wasn't made to go.

Here I have started to unstitch the waist band. You can see my roughly drawn chalk lines  on how much I want to take out. You'll want to unstitch slowly to make sure you know how it will fit back together. Unstitch both (if you have two) rows of topstitching (or just one if you've only got one) along the center back seam. It's serged  so you don't have to worry too much.

Note: The top of the waist band on my jeans was topstitched, but it wasn't stitched together. Basically when I unstitched the topstitcing at the very top, there was no inside seam holding the band and the band facing together. I had to baste these together for the next steps (sorry, no picture of that)

Open out the band like shown.

(For doing a lot of graphic design work, I'm surprisingly terrible at microsoft paint)

I made a little Key:
Green Dot: Waist band facing
Red Dot and Orange 'stitching" where the band and the band facing meet. On mine I had to baste them together after I took out the top stitching
Yellow dot: Waist band
Pink 'stitching': where you will stitch (depending on how much you are taking in)

Use long machine stitches to baste the back seam. Go slow when you do the waist band. It will be difficult because you won't have unstitched that much (you want to keep as much original topstiching as possible to keep it looking the same)


In the above picture I started at the crotch. I started on the serged seam line and gradually met my chalk lines.


After basting, try one. Take in or out. You will have to cut straight out at the back (where my finger is in the pic above) to make it lay flat. Only to this on the waist band and facing. The rest of the excess you'll trim off later.


I marked a few spots I wanted to take in a bit more.

Notice how now there is a seam line in the waist that wasn't there before? Good. Also notice how my back yolk stitching doesn't line up? Bad. This is why it's basted. Carefully line them up, pin and sew slowly to match them up.


Here's the inside of mine. I trimmed off the excess to about 1/4"-1/2" fabric from the inside where it was serged. I zigzagged the edge and then topstitched it down from the outside. I didn't take many more photos of the process because mostly I just had to finesse it. Luckily, it turned out very forgiving. (Make sure to press, press, press!)

Topstich using a heavy thread (I only had a thick brown and a regular gray. I would suggest getting some that match the original top stitching that way it blends in even better). I had to top stitch the top of the waist band, the bottom of the waist band where it met the yolk, and the center back. Then stitch on your belt loop and voila! Enjoy your new pants.

Often, mens' pants have a center back seam to make it easier to customize the fit, or if you've seen this post from Gertie's Blog For Better Sewing, you can see how she used the center back seam to better fit her trousers. (Do you know that I LOVE her blog?)

With jeans, it's about the stitching: top stitching is what makes jeans JEANS. Don't be intimidated if it seems like a lot of steps. Any intermediate sewer is definitely capable of doing this. Mostly it's just figuring how it goes back together.

Happy sewing!

Tuesday, November 16, 2010

In love with this dress.


 "Jillian made her own wedding gown, including the pattern for it.  She deconstructed a vintage dress to make the pattern for the bodice, sewed it, and then began to work on the doilies.  It took three weeks and over two miles of crochet yarn to complete the effect."


I found these photos through a variety of links, but the source is this amazing website by Gia Canali. Sooo many beautiful things to look at. 
I'm swooning so hard.

Anyone want to attempt making a dress like this with me?

Monday, November 8, 2010

Glasses


So I just thought I'd share these wonderful vintage glasses that I rediscovered in an  unpacked box. A long while I got these glasses as Savers in Orem, UT. That's how long ago it was. I couldn't pass them up. When I got them they had some serious coke-bottle lenses in them. I fell in love with them so much I wore  them in the car home. Was that a good idea? No, not at all; but it didn't stop me. I ended up just popping the lenses out and wearing them as is. They're wonderful silver cat eyeswith lil flowers in the cat-eyeness-part. So great.
Just so you know, it's really hard to take pictures of said glasses while wearing them, for obvious reasons.

Trust me, my hair looked better earlier.  I got the idea from the Peacock and Pear blog, and did a wavey thing, but it kind of limped out.

I really feel like these glasses would made Gertie proud.


Like  I said, it's really hard to take a good picture of them while wearing- it ends up looking like this. HAHAHA. Ugh. Hah.
(I love them enough to post this.)

Wednesday, August 25, 2010

Hey There! Remember me? And a blue skirt.

Remember how I said I'd be back? Well I finally got a picture of a recent skirt. I've been on a skirt kick lately. Go figure!
Do you remember my white skirt from a few posts back? You guessed it...its' the same McCall's pattern. I really am in love with this skirt. For starters: it's navy blue!, it makes me look like I have a waist, it was easy to sew, and the length is short enough to be modern but long enough to still meet my coverage needs. Definitely loving it.
It has front pleats, which I was apprehensive about at first, but now realize that they are very flattering.

Is there a back drop behind me? OH  wait, that's just how beautiful Kentucky is... (ignore my weirdy face)
And this last one just because I like it

Saturday, August 21, 2010

I'm a mess!

I haven't posted in nearly a millenia. I've got so many things brewing though, that I rather ought to be. I'm back home in Kentucky right now until the 1st. I promised myself that I'd upload some posts so soon. I even wrote it down in my day planner. I've just been procrastinating in the putting it all together. But no fear, I will make a grand re appearance shortly.

Saturday, July 24, 2010

Mens patterns, or the lack thereof

Is anyone disturbed by the amount (or lack of) patterns for men? What's a girl supposed to do. Perusing the men's pattern market= slim pickings. And I'm talking about a  real  pattern.
I flat out refuse to make my husband anything that has both genders on the cover, or labled "unisex" . Gross. Like these:

Hahahaha. Hah. Ha. Seriously? No.
But the only honest looking things I've seen are these:
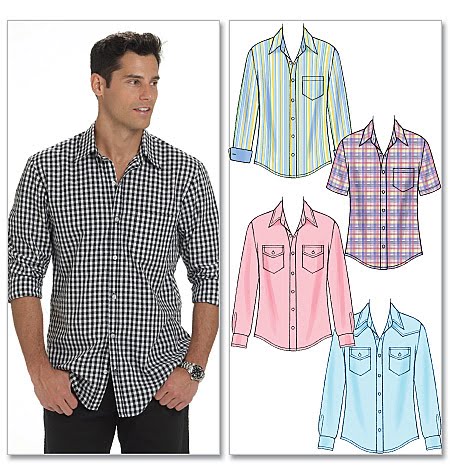
This one from McCall's
and these from Vogue


Unless you want to make a vest. Then there's a bazillion patterns. Who knew they were in such demand?

Wait wait wait...I forgot about something....

Erica B blogged about an outfit she made her husband from some Kwik Sew patterns and it looks like they have some reasonable ones. And from what I've read apparently they're sizing is reasonably accurate


So I guess as I've done research (can I call it that) to write this post, I've stumbled upon more than I thought I would. Hallelujah.

On a lighter note... don't worry because I was able to find this "robe"

Thursday, July 22, 2010

Updates

Okay, not much to update. We're here. Not much going on. Just mostly hanging around the house. The past few days have been very cloudy and hazy so beach time has been less than ideal. Also, the waves are large. I tired to surf on Chris' short board but I could barely paddle out ( 1. huge bunched up wetsuit, 2. short boards are a lot harder than long boards and 3. the size of the waves were terrifying me and it took loads of courage just to get out there)
As far as sewing goes....well I haven't done any! I know shame on me.
Don't worry, I haven't forgotten about my summer sewing goals. I got some fabric yesterday which I'm planning to use on a dress. Do you ever feel like the patterns you have just aren't quite good, interesting, or challenging enough? I'm starting to feel that way about all my sewing patterns.A little discontent.
I also decided to pick up some Fimo clay. I know it's not sewing related, but I thought I'd try making some earrings. I've never ventured into the world of polymer clay, avoiding some hokey-ness that can happen....
I'm going to break out the ol' sewing machine and if I've got time, try making some earrings.
But until then, lasagna for dinner!!

Monday, July 19, 2010

In San Diego, and a free bin dress

We made it. We're here. It been sunny and warm, but refeshingly cool in the shade. I have to adjust to the aridness in the air, I'm so used to thick bogs of humidity. We're going to explore the city today and run some errands but I though I'd post a dress a did a couple of weeks ago that I wore yesterday to church.

I found this wonder in the magical free bin. You know I love that thing! I just stumbled upon it. It was kinda weird looking but then I saw the front part which reminded me of this


source

I know it might be a stretch, maybe i was just thinking of the color and the pin tucks in front. Either way it had potential.

The first thing that needed to go was the lace around the neckline, too dowdy!


Overall this was extremely simple. Most of my sewing in the last few weeks has been quick projects to make a piece of clothing fit better. I took in the sides. There were pockets that I cut out when making the sides smaller but I was in a rush to pack up and thre them away, so I guess I won't be putting them back in. I Hemmed it up a few inches to make it more appealing on me and voila! a new dress. I was going to cut it down into a shirt but I'm in need of some summery dresses. It gets pretty warm here and a dress isjust what I'm in th market for.


I love the little ties that attach with a button. I pulled them around the back and then tied a little bow in the front. I really like how it turned out.
Chris wanted me to show off the braid I did in the front of my hair. I don't have any close pictures of it though.